.png)
Getting Started
The PETE for JSM app gives IT support leadership teams a complete view of key KPIs, tracking how effectively the organization meets its responsibilities. A well-functioning IT support team is a leading indicator of happy customers—and restful nights!
Your decision to use PETE for JSM shows your commitment to building an effective IT support organization. We appreciate your trust and rely on your feedback to continuously push our limits and deliver features that fully meet your goals.
Let’s now get you started with using the App.
Step 1: Accessing the App:
Install PETE for JSM app from Atlassian Marketplace.
Log into to Jira Service Management
PETE for JSM app will now be available under the ‘Apps’ menu
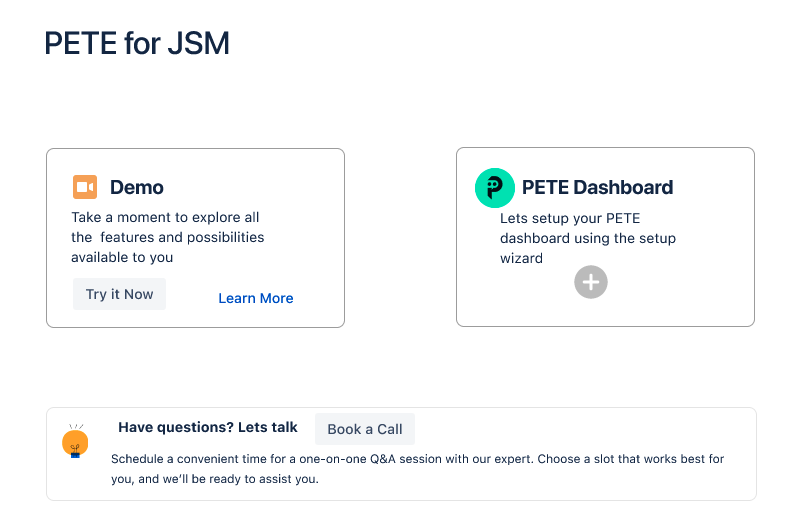
Step 2: Start Page
When the app is launched for the first time, you will see the Start Page.
Here, there are two actions which can be taken.
Check out the Demo Dashboard. It is a fastest way to understand what is possible using PETE for JSM and how effective the app is for your organization.
Create your first dashboard. Click on PETE Dashboard which kicks off the Setup Wizard. The setup wizard will guide you through to configure the dashboard the way you want it.
Step 3: Creating the PETE Dashboard
The setup wizard makes creating the PETE dashboard a breeze.
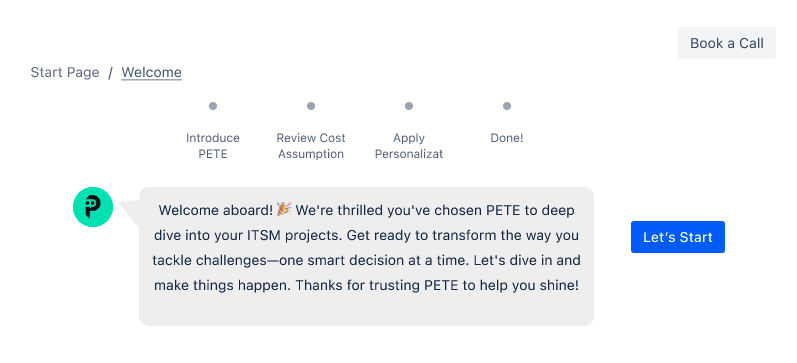
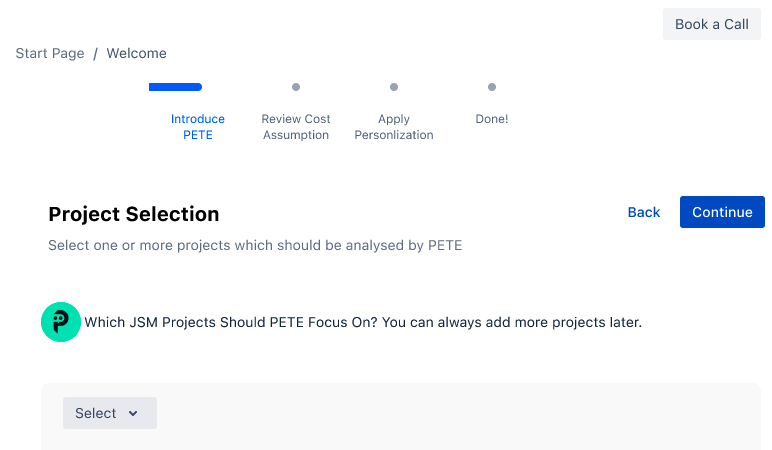
Step 3.1: Introduce PETE to your JSM Projects
Here, you’ll let PETE know which JSM projects should be analyzed and share how you’ve configured them. PETE does its best to learn on its own, but hey, it’s always good to double-check! This step includes several sub-steps, which are detailed in the following sub-section.
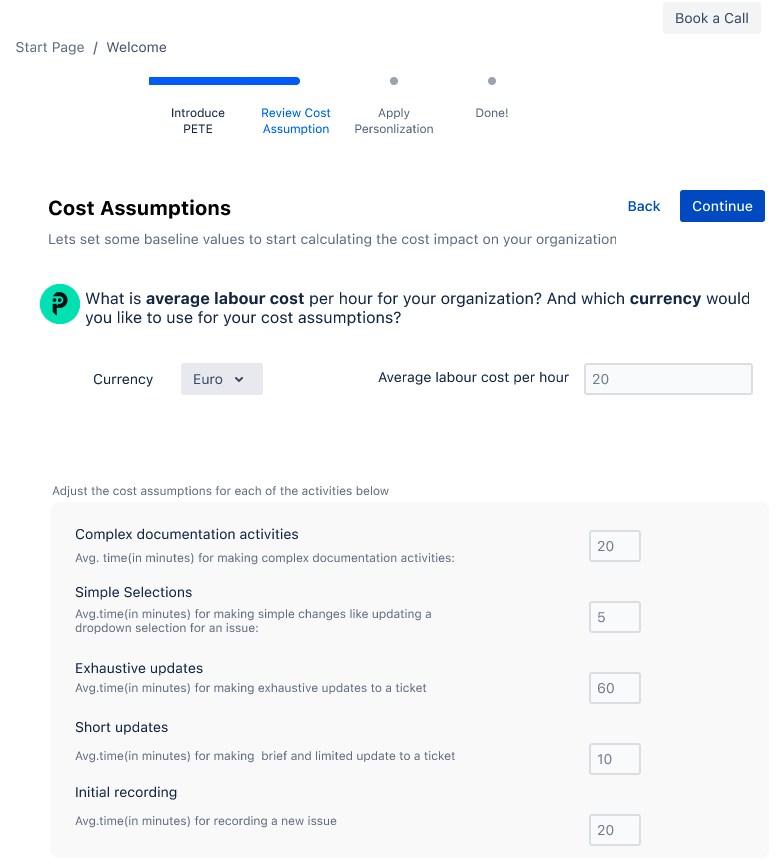
Step 3.2: Review Cost Assumptions
PETE uses advanced process mining techniques to calculate the inefficiencies in your ITSM workflows. In this step, you’ll review and adjust the cost assumptions to better fit your organization.
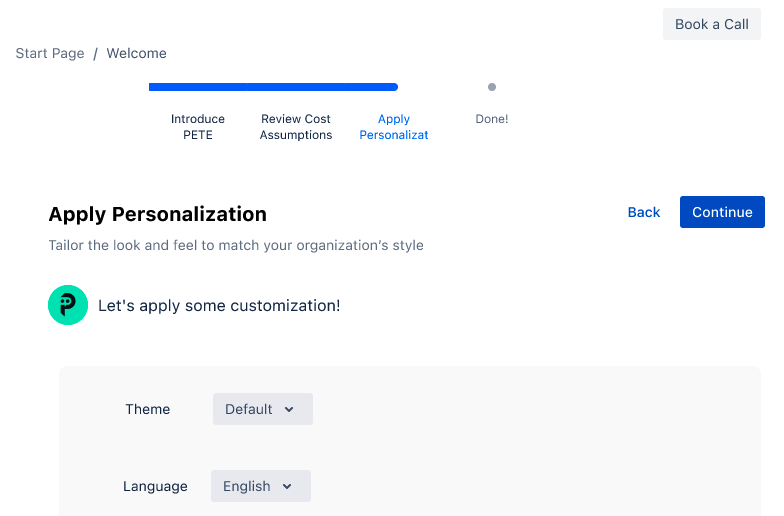
Step 3.3: Apply Personalization
Customize PETE’s look and feel to better align with your organization’s culture and style.
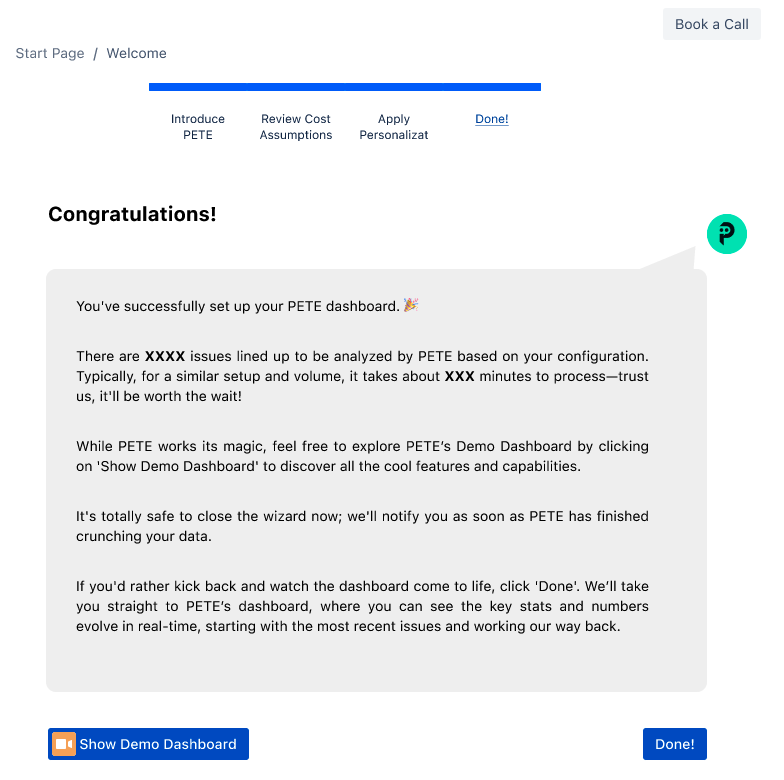
Step 3.4: Done! 🎉
PETE will now start analyzing your data. Depending on the size of your projects, this may take a few minutes to complete.
Field Mapping steps in detail
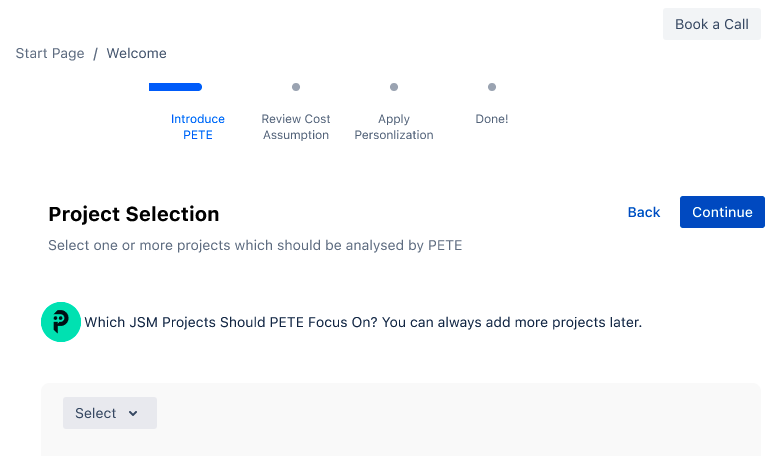
Project Selection
In Project Selection, please select the projects that PETE should analyse.
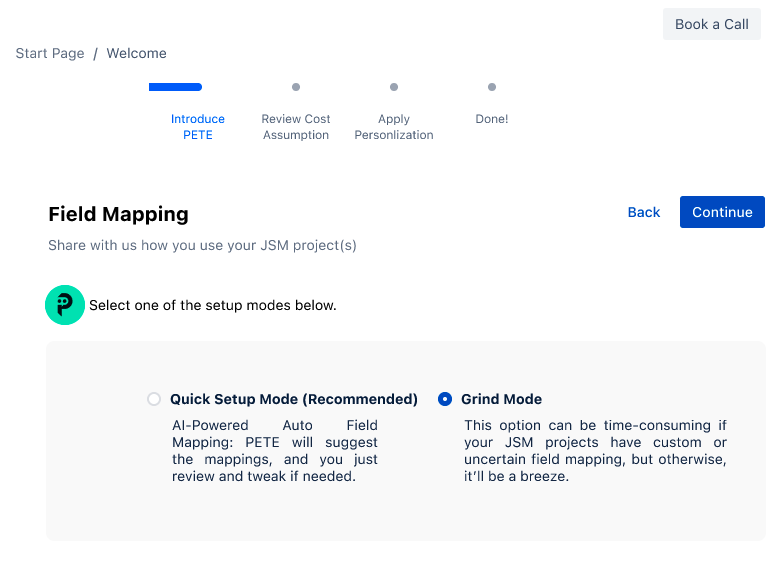
Select field mapping mode
PETE uses specific names in its database. These names may differ from the ones
configured in the JSM Project since every project is highly customizable, so it’s essential to understand how each project is configured. Since each project may differ, mapping them can become a time-consuming task.
To make things easier, PETE learns your field configurations and suggests likely mappings to reduce the effort. However, please review the mappings to ensure PETE gets it right.
The good news? This is usually a one-time exercise for most organizations, with only minor updates needed throughout the project lifecycle.
There are two setup modes to choose:
Quick Setup Mode (Recommended) - In this mode, PETE reviews the fields used in the project and provides an AI-powered suggestion to map all the fields. The Quick Setup Mode will be the only mode you would want to work with in most cases.
Grind Mode - When you want total control of the field mapping process, you can select Grind Mode. This can take some time. But it guarantees that everything happens just the way you want it.
Share with PETE how you categorize Issue Types to your processes
In this step, you select the Issue Types in your JSM project used to implement ITSM processes.

Share with PETE how you track Status of an issue in your Projects
In this step, you select the Status fields used in your Issues and map to the industry-standardized status fields which PETE can use to perform its analysis.
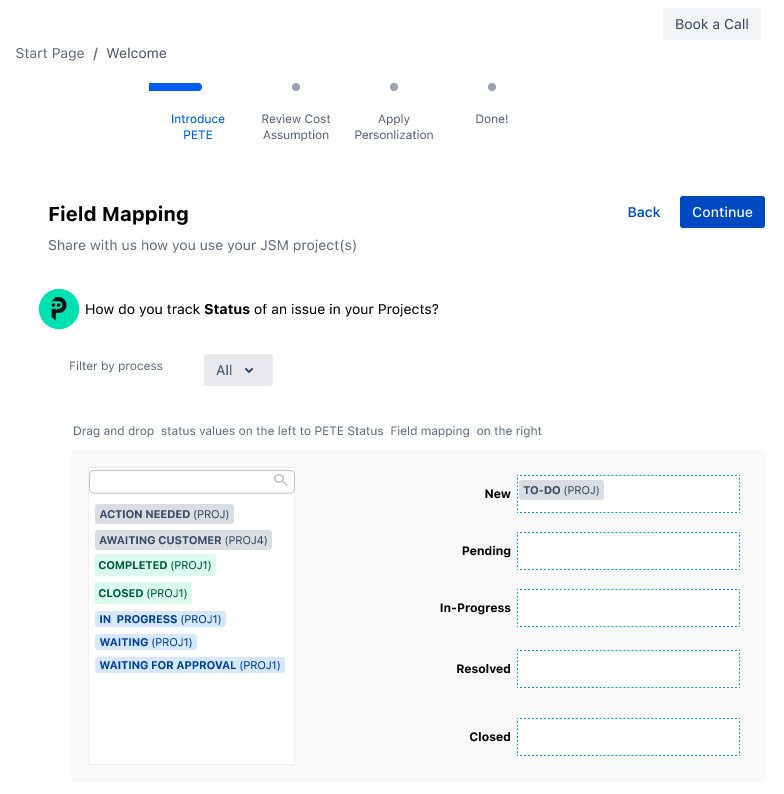
Status | Definition |
|---|---|
New | This status value is used only once when a issue is opened for the first time. |
Pending | This status is used when customers' feedback needs to be waited for, or the issue is assigned a ticket to a third party. |
In-Progress | This status is used when somebody is actively working on an issue |
Resolved | This status is used when a solution has been provided to the customer, and all actions from the support team have been completed. An issue that has been set to ‘Resolved’ status can be reopened within a pre-defined timeframe if the customer is not satisfied with the solution provided. |
Closed | This status is the final status of an issue. Issues set to ‘Closed’ status cannot be reopened again. |
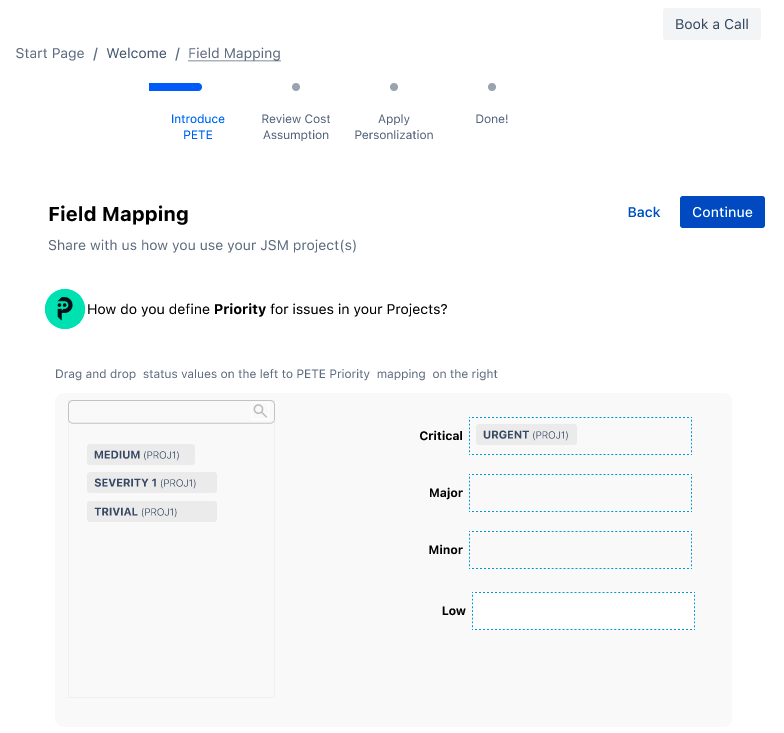
Share with PETE how you define Priority for issues in your Projects
In this step, you share with PETE the fields used to document the Priority of an Issue.
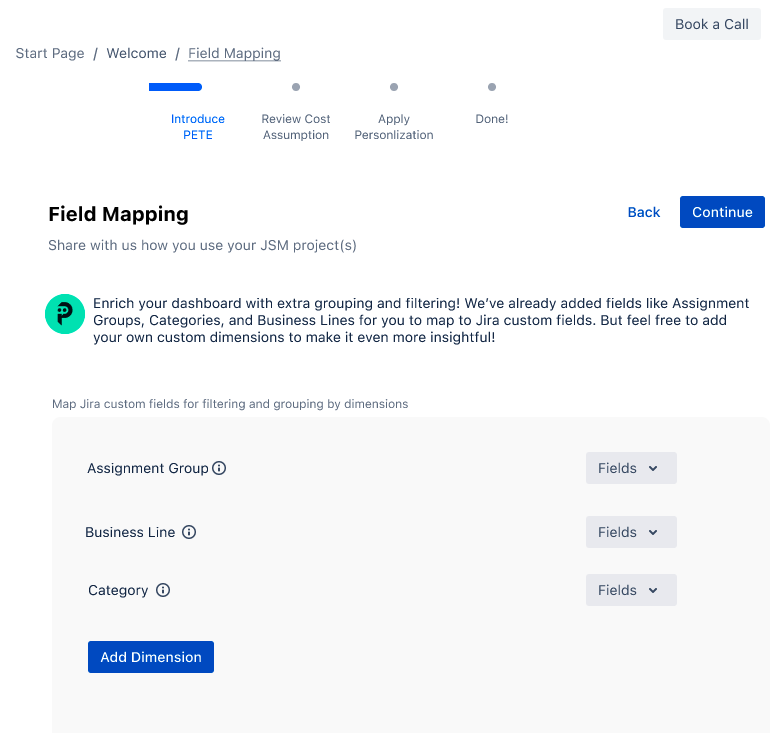
Map key dimensions typical of ITSM processes and add your custom dimensions
PETE’s analysis taps into industry best practices, using fields like Assignment Group, Business Line, and Category. We assume your organization’s got these covered, but if not, no worries—leave them blank, and PETE will still work its magic!
If your organization has specific dimensions you’d like PETE to analyze, feel free to add your custom dimensions—PETE’s got you covered! These will be used to enhance ‘Group By’ and ‘Filter’ actions on PETE’s dashboard, giving you even more control.
That’s it! You’ve successfully guided PETE on how to understand your organization and team-specific JSM projects. If you missed anything, no worries—you can always come back and update the details later.